🎬 Mastering Seedance 2.0
Written By Leonid
Last updated About 13 hours ago
What Seedance 2.0 is
Seedance 2.0 is ByteDance's video-generation model, now live across Text to Video, Image to Video, and Video to Video on ZenCreator. It's built on a unified architecture that generates video and audio together as one process, rather than treating sound as an afterthought bolted on at the end.
Where most video models animate a single picture, Seedance 2.0 reads a scene as a whole — who's in frame, what's happening, where, how the camera should move, and in what style — and builds a coherent clip around that understanding.
What makes it different
It understands the whole scene, not just a picture. Subject, action, environment, and camera all come together into one coherent clip, with noticeably more stable motion than earlier models.
It supports two generation modes. Use the standard mode with a First/Last Frame upload for a controlled start and end, or switch to Reference Mode to combine up to 9 images and 3 audio clips as style, identity, and motion inputs — each addressed directly by name in your prompt.
It generates audio and video together. Sound and motion land in sync without a separate lipsync or audio step.
It edits existing footage precisely. In Video to Video, you can swap a costume, background, or lighting while the original movement and timing stay untouched.
The four inputs: who's responsible for what
This is the most useful mental model for working with Seedance 2.0. Each input type has its own job — don't ask one to do another's work.
Text controls the spatial — appearance, mood, style, environment.
Image controls identity — exactly how a character, object, or scene looks.
Video controls the temporal — timing, rhythm, camera motion. In practice, this input is used in Video to Video, where the clip you're editing is itself the video reference.
Audio controls rhythm and sound — pacing, how motion syncs to sound.
Rule of thumb: text and image for what things look like, video and audio for how they move and sound. Describing complex motion with a stack of adverbs ("quickly, smoothly, suddenly") rarely works as well as simply attaching a video reference and letting the model copy the dynamics.
Five ways to generate
Text to Video — just a prompt, no source material. Maximum flexibility.
First Frame — one image becomes the literal starting frame of the video.
First + Last Frame — two images define a guaranteed start and end; the model builds the transition between them.
Reference Mode — multiple images and audio clips used as style, identity, or motion references (not a literal first frame). Exactly what you can attach depends on the tool — see the interface tour below for what’s available in Image to Video specifically.
Video to Video — edit an existing clip, changing what you specify while preserving everything else.
A common mix-up: uploading one image in Reference Mode does not make it the first frame — the model treats it as a style/identity reference and builds the actual opening frame from your prompt text. If you want your photo to literally open the clip, use First Frame mode instead.
The prompt formula
Every strong Seedance 2.0 prompt follows the same structure. You won't need every block every time, but Subject and Action are the foundation — without them, the scene drifts.
Subject — who or what is in frame
Action — one verb, present tense, one clear motion
Environment — location, background, atmosphere
Camera — shot size, movement, angle
Lighting — source and quality of light
Style — the visual language: cinematic, editorial, etc.
Constraints — stability and quality requirements
The model weights the first 20–30 words most heavily — put Subject and Action right at the start.
Four rules that consistently help:
One action per shot — "walks, turns, and smiles" is three actions and a blurry result
Present tense verbs — "rolls," "turns," "falls," not "will roll"
Specificity beats a pile of adjectives
Describe what should be in frame, not what shouldn't (save exclusions for Constraints)
Combining references: the tag syntax
When you upload multiple images or audio clips, tag them directly in your prompt so the model knows which one you mean. The exact tag format depends on the tool — always check the placeholder text in the prompt box, which shows the live syntax for that tool.
In Image to Video, references are tagged as:
Images: [img1], [img2]... (up to 9, numbered by upload order)
Audio: [audio1], [audio2], [audio3] (up to 3)
Example: “The woman from [img1] walks up to the mirror. Her pose references [img2].” — [img1] defines who she is, [img2] defines her pose. The text glues them into one scene.
Interface tour: Seedance 2.0 Spicy in Image to Video
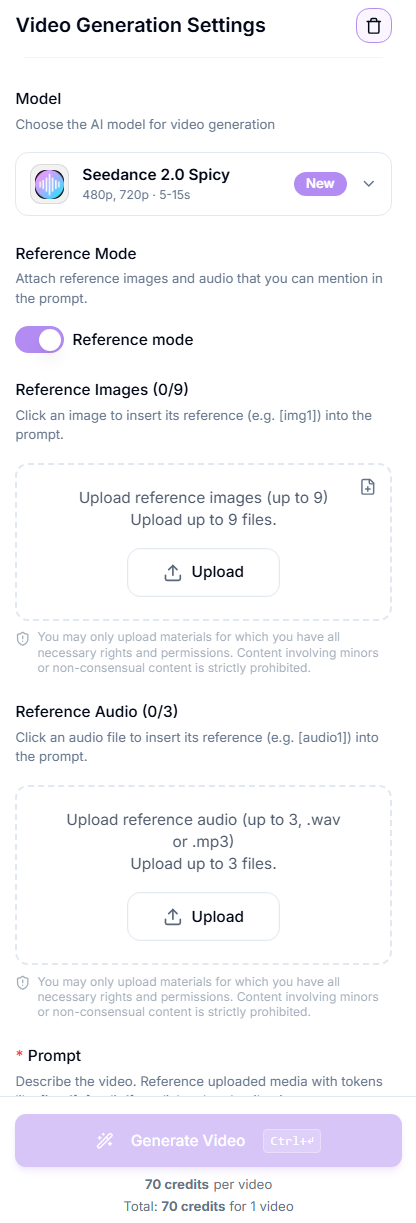
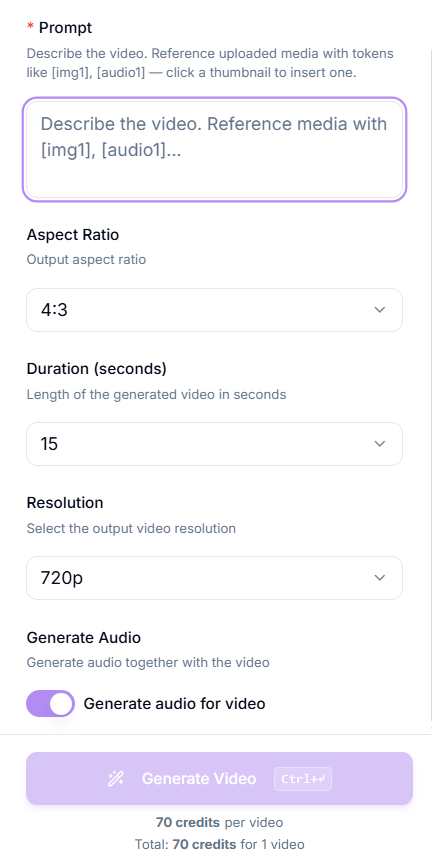
Here’s what generating with Seedance 2.0 Spicy actually looks like inside Image to Video, step by step, in the order the settings appear on screen.
Model. Seedance 2.0 Spicy is selected — the NSFW-trained version of Seedance 2.0 for this tool (480p/720p, 5–15s).
Reference Mode toggle. Turn this on to attach reference images and audio you can mention in the prompt. Leave it off to use a single image as a literal first frame instead.
Reference Images (0/9). Upload up to 9 images. Click any uploaded thumbnail to insert its tag (e.g. [img1]) into the prompt automatically.
Reference Audio (0/3). Upload up to 3 audio files (.wav or .mp3). Click a file to insert its tag (e.g. [audio1]) into the prompt.
Prompt. Describe the video using the seven-block formula above. Reference your uploaded media with the tokens you inserted — e.g. “[img1] turns toward the camera, [audio1] plays as she speaks.”
Aspect Ratio. Set the output aspect ratio (e.g. 4:3).
Duration (seconds). Choose from 5, 6, 8, 10, 12, or 15 seconds.
Resolution. 480p or 720p.
Generate Audio. Toggle this on to generate audio together with the video. Turning it on roughly doubles the credit cost — check the price shown above the Generate button before confirming.
Generate Video. Review the credit cost shown below the button, then generate. Check the opening frame first — if the composition or pose is off, double-check whether Reference Mode is really doing what you expect versus a literal first frame.
Common problems and how to fix them
Result looks generic or faceless → weak subject/action or adjective stacking. Rewrite with a specific subject and one clear action in the first words.
Skin or surfaces look plastic or "3D" → add "no 3D, no cartoon, no VFX" and "film grain, natural imperfections."
Character changes between generations → reuse the same reference image, tag it with [img1] (or the equivalent tag shown in that tool), and add "maintaining consistent [subject]."
Not enough fine detail at 720p → detail wasn't explicitly requested. Add "ultra-sharp detail" or "crisp texture."
Camera or motion feels unstable → add "stable [subject], smooth motion."
Part of the prompt seems ignored → the prompt is too long, contradictory, or crams a multi-shot sequence into one paragraph. Break it into separate, numbered shots.
Quick pre-generation checklist:
Subject and action in the first 20–30 words?
One action per shot, present-tense verb?
Camera stated explicitly (size + movement + angle)?
References tagged correctly for the tool you're using (e.g. [img1] / [audio1] in Image to Video)?
Stability constraints included for realism (no 3D/cartoon/VFX)?